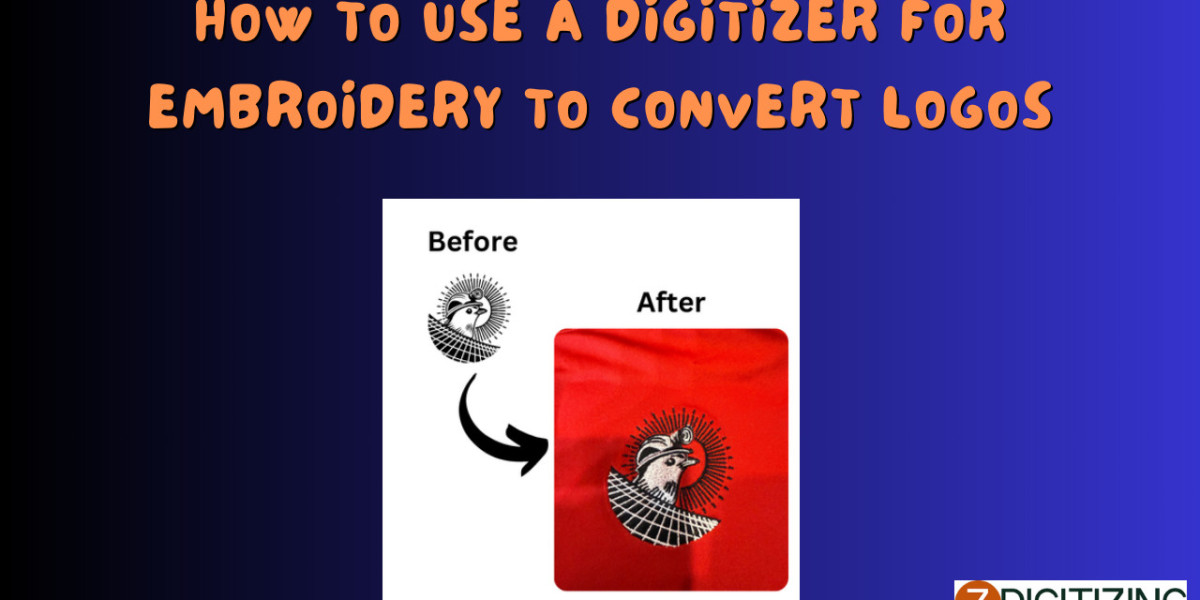
Converting logos into embroidered designs is a game-changer for businesses, crafters, and designers looking to add a professional touch to apparel, merchandise, or uniforms. A digitizer—whether software or a professional service—is the key to transforming your logo into a stitch file for embroidery machines. This blog provides a detailed guide on how to use a digitizer for embroidery to convert logos, offering step-by-step instructions and tips to ensure high-quality results.
What is a Digitizer for Embroidery?
A digitizer for embroidery is a tool or service that converts artwork, like a logo, into a digital stitch file (e.g., DST, PES, EXP) that an embroidery machine can interpret. Digitizing software (e.g., Wilcom, Hatch) allows you to do this yourself, while professional digitizers offer expert conversion. For logos, precision and clarity are crucial, and the right digitizing approach makes all the difference.
Why Convert Logos for Embroidery?
Logos are the face of a brand or identity. Embroidering them onto shirts, hats, or bags enhances visibility and durability compared to printing. Using a digitizer ensures your logo translates perfectly into stitches, maintaining its recognizable features on fabric. Whether for branding or personalization, this process elevates your project’s quality.
How to Use a Digitizer to Convert Logos for Embroidery
Step 1: Prepare Your Logo
Start with a clean, high-quality version of your logo:
- Preferred Format: Vector files (AI, EPS, SVG) for scalability and sharpness.
- Alternative: High-resolution raster (PNG, JPEG) at 300 DPI or higher.
- Simplify: Remove tiny details or excessive colors that won’t stitch well.
Why It Matters: A clear logo reduces digitizing time and ensures accuracy.
Step 2: Choose Your Digitizing Method
You have two options:
- DIY with Software: Use tools like Hatch, Wilcom, or Brother PE-Design for hands-on control.
- Professional Service: Outsource to experts via platforms like Fiverr or dedicated providers.
Best Choice: DIY for simple logos and learning; pros for complex designs or tight deadlines.
Step 3: Set Up Your Digitizing Software (DIY Method)
If digitizing yourself:
- Install software on a fast computer.
- Open your logo file in the program.
- Set the design size (e.g., 3” x 3” for a chest logo).
Tip: Check your machine’s hoop size to ensure compatibility.
Step 4: Trace and Map the Logo
In the software:
- Import the Image: Load your logo as a background.
- Trace Outlines: Use manual tools or auto-trace for vector files to define shapes.
- Assign Stitches: Select stitch types—satin for outlines, fill for solid areas.
Why It’s Key: Proper tracing ensures the logo’s shapes and details are preserved.
Step 5: Adjust Stitch Settings
Fine-tune the design:
- Stitch Density: Balance coverage and fabric stability (e.g., 0.4-0.5 mm spacing).
- Direction: Angle stitches to follow the logo’s flow.
- Underlay: Add base stitches for support on stretchy fabrics.
Pro Tip: Test settings on scrap fabric to avoid puckering.
Step 6: Assign Colors and Sequence
For multi-color logos:
- Match thread colors to your logo (use Pantone codes if available).
- Sequence colors to minimize thread changes (e.g., stitch all red areas first).
Why It Helps: Efficient sequencing speeds up embroidery on the machine.
Step 7: Preview and Test
Before finalizing:
- Use the software’s 3D preview to check stitch placement.
- Stitch a sample on similar fabric to your final product.
Why It’s Fast: A quick test catches errors early, saving rework.
Step 8: Save and Export
Once satisfied:
- Save the file in your machine’s format (e.g., PES for Brother, DST for Tajima).
- Export and transfer to your embroidery machine via USB or direct connection.
Tip: Keep a backup for future use.
Alternative: Using a Professional Digitizer
If outsourcing:
- Submit your logo (vector or high-res) to the service.
- Specify size, fabric, and machine format.
- Receive a file in 24-48 hours, ready to stitch.
Why It Works: Pros handle complexity and deliver fast, flawless results.
Best Digitizing Tools for Logos
- Hatch Embroidery: User-friendly with auto-digitizing for beginners.
- Wilcom EmbroideryStudio: Pro-level precision for detailed logos.
- SewArt: Budget-friendly for basic conversions.
- Professional Services: Fast, expert results without software learning.
Choose Based On: Skill level, logo complexity, and time constraints.
Tips for Successful Logo Conversion
- Start with a logo no smaller than 2” for clear stitching.
- Avoid gradients—use solid colors instead.
- Request a stitch-out sample from pros or test yourself.
- Communicate brand colors clearly (e.g., “Red #FF0000”).
Precision starts with preparation.
Benefits of Digitizing Logos for Embroidery
- Professional Look: Crisp, durable designs elevate branding.
- Consistency: Identical logos across multiple items.
- Versatility: Works on shirts, caps, bags, and more.
- Time Savings: Reusable files for future projects.
A well-digitized logo pays off long-term.
Common Mistakes to Avoid
- Using low-res images—leads to blurry stitches.
- Overloading details—small elements get lost.
- Ignoring fabric type—causes distortion.
- Skipping previews—misses errors until too late.
Avoid these for a smooth process.
How Technology Speeds Up Logo Digitizing
- AI: Auto-maps stitches for quick conversions.
- Cloud Services: Instant file delivery from pros.
- Real-Time Previews: See results before stitching.
Modern tools make digitizing faster and smarter.
Conclusion
Using a digitizer to convert logos for embroidery is a straightforward process with the right approach. Whether you’re mastering software like Hatch or outsourcing to a pro, you can turn your logo into a stunning embroidered design efficiently. From preparing your artwork to testing the final file, each step ensures quality and speed. Ready to embroider your logo? Grab your digitizer—DIY or pro—and stitch your brand onto fabric today!
FAQs About Converting Logos for Embroidery
What’s the best way to digitize a logo?
Use vector files with software like Wilcom or hire a pro for complex logos.
How long does it take to convert a logo?
DIY takes 15-60 minutes; pros deliver in 24-48 hours.
What file format should I use?
Start with AI or EPS; export to your machine’s format (e.g., DST, PES).
Can any logo be embroidered?
Yes, if simplified—tiny details may need adjustment.
Is DIY or professional digitizing better for logos?
DIY for simple logos; pros for intricate or urgent needs.
What’s the smallest logo size for embroidery?
About 2” wide—smaller risks losing clarity.