If you've ever wanted to create your own mobile application, Android is an excellent place to start. As the most widely used operating system in the world, learning Android development opens up a world of possibilities. Whether you're looking to build an app for personal use, a side project, or even a full-fledged business, Android development can help you make your idea a reality. In this Android development tutorial, we’ll walk you through the basics and show you how to build your first Android app.
What is Android Development?
Android development refers to the process of creating applications for Android-powered devices, such as smartphones, tablets, smartwatches, and even TVs. The Android operating system is based on Java and Kotlin programming languages, and Android apps are primarily built using Android Studio, a powerful integrated development environment (IDE) provided by Google.
For those looking to get started with Android development, this tutorial is perfect for beginners. We’ll cover the essential concepts and tools needed to kick-start your journey into mobile app development.
Setting Up Your Development Environment
Before we dive into writing any code, let’s first set up the necessary tools for Android development.
- Install Android Studio
Android Studio is the official IDE for Android app development. It comes with all the tools you need, including a code editor, emulator, and debugging tools.
- Visit the Android Studio website and download the version that’s appropriate for your operating system (Windows, macOS, or Linux).
- Follow the installation instructions and launch Android Studio after the setup is complete.
- You will need to configure Android Studio with the Android SDK (Software Development Kit), which includes all the libraries and tools required for building Android apps.
Set Up Your First Android Project
Once Android Studio is up and running, you can create your first Android app:
- Open Android Studio, and click on “Start a New Android Studio Project.”
- Choose a project template. For beginners, the “Empty Activity” template is a great starting point.
- Enter a name for your app (e.g., "MyFirstApp"), choose a save location, and set the language to Java or Kotlin (we recommend Kotlin for modern Android development).
- Select the minimum SDK version. This determines the Android devices that can run your app. A good choice is usually API 21 (Android 5.0 Lollipop), as it covers most devices.
Exploring the Project Structure
Once your project is created, you will see several files and folders in Android Studio. Here’s a breakdown of the most important components:
- app > src > main > java
This folder contains the Java or Kotlin code for your app. It will include the MainActivity file, where you will write the code that powers the core functionality of your app. - app > src > main > res
The resources folder holds all the non-code assets for your app, such as images, layout files, and strings. Layout files (XML files) define the visual structure of your app, like buttons, text fields, and images. - AndroidManifest.xml
This file contains essential information about your app, such as its name, version, permissions, and which activities are available.
Writing Your First Android App
Now, let’s build a simple Android app that displays a message when you click a button. We’ll walk through the necessary code step-by-step.
- Design the User Interface (UI)
In Android development, the user interface is typically built using XML layout files. These files describe the elements on the screen and their properties.
- Open the activity_main.xml file (found under res > layout).
- Replace its contents with the following XML code to create a Button and a TextView:
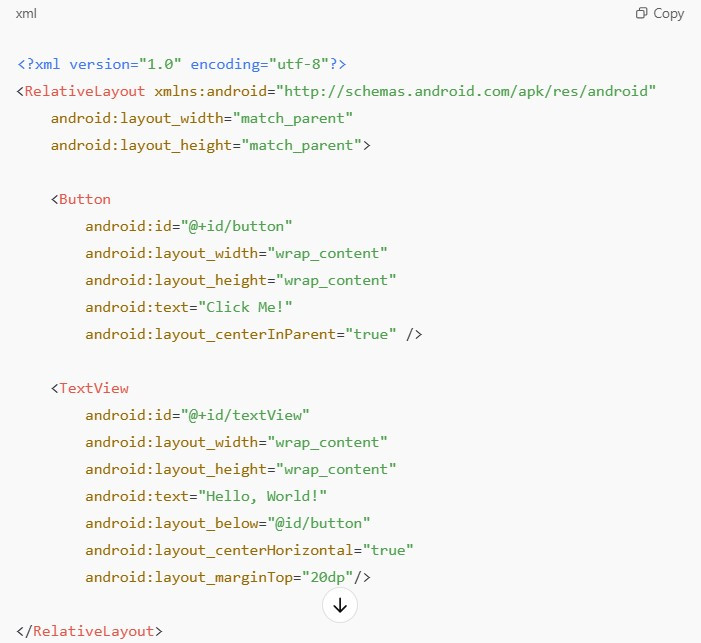
In this layout, we have a Button with the text "Click Me!" and a TextView that initially displays "Hello, World!"
- Add the Code to Make the Button Work
Next, you need to add the logic to change the text when the button is clicked. Open the MainActivity.java (or MainActivity.kt if you're using Kotlin) file, and replace the code with the following:

Here’s what happens in this code:
- We find the Button and TextView elements by their IDs.
- We set an OnClickListener on the button so that when it’s clicked, the text of the TextView changes to "Button Clicked!"
Run the App
You can now test your app! To do so, you’ll need an Android emulator or a physical device:
- To use the emulator, click on the "Run" button in Android Studio and select an available virtual device (or create a new one if you don’t have one).
- If you have a physical Android device, you can connect it via USB, enable Developer Mode on the device, and select it as the deployment target.
Once your app runs, you should see the button in the center of the screen. When you click it, the message below the button should change to “Button Clicked!”
Key Takeaways from This Android Tutorial for Beginners
- Android Studio is the primary tool for Android development, providing everything you need to build and test apps.
- XML Layouts define how your app’s UI looks and behaves, allowing you to arrange buttons, text, images, and other elements.
- Java/Kotlin is used to write the logic for your app, making it interactive and functional.
- Testing is easy with the Android Emulator or by running the app on a real device.
This Android development tutorial is just the beginning. Once you get comfortable with these basics, you can start exploring more advanced features like working with databases, integrating APIs, and designing more complex UIs. Keep practicing, and soon you’ll be able to build fully functional Android apps!
Conclusion
We hope this Android development tutorial has given you a solid foundation to start your app-building journey. If you’re a beginner, don’t worry—Android development may seem challenging at first, but with persistence and practice, you’ll improve in no time. There are plenty of resources available to help you along the way, so keep learning and experimenting with new features.
Now that you know how to build your first Android app, the next step is to explore more advanced concepts and start creating your own unique projects. Happy coding!