With their thin profile and flexibility, LED strip lights can be easily cut, extended, and shaped to fit different spaces, making them ideal for both irregular and small areas. They are commonly used in advertising and decorative lighting.
What are LED strip lights?
LED strip lights are made from FPC, which is a flexible circuit board, and high-brightness LEDs. The thickness of an low voltage tape light is equivalent to that of a coin, allowing it to be discreetly hidden. LED strip lights can be cut into smaller segments without affecting the overall performance or light output. The flexibility of the FPC material allows the LED strip lights to be bent, folded, rolled, and extended in three-dimensional space without breaking. This makes them suitable for unconventional spaces and small areas.
LED strip lights are widely used in various applications, but some people may not know how to properly cut, connect, and power them. This article aims to provide guidance on this matter.
The article is divided into two parts:
- Part 1: Cutting, connecting, and powering LED strip lights using soldering
- Part 2: Cutting, connecting, and powering LED strip lights using non-soldering connectors
Where can I cut LED strip lights?
Before cutting LED strip lights, make sure that the specific strip can be cut. Otherwise, cutting the strip may render it unusable. Also, always remember to disconnect the power source before cutting the LED strip lights directly.
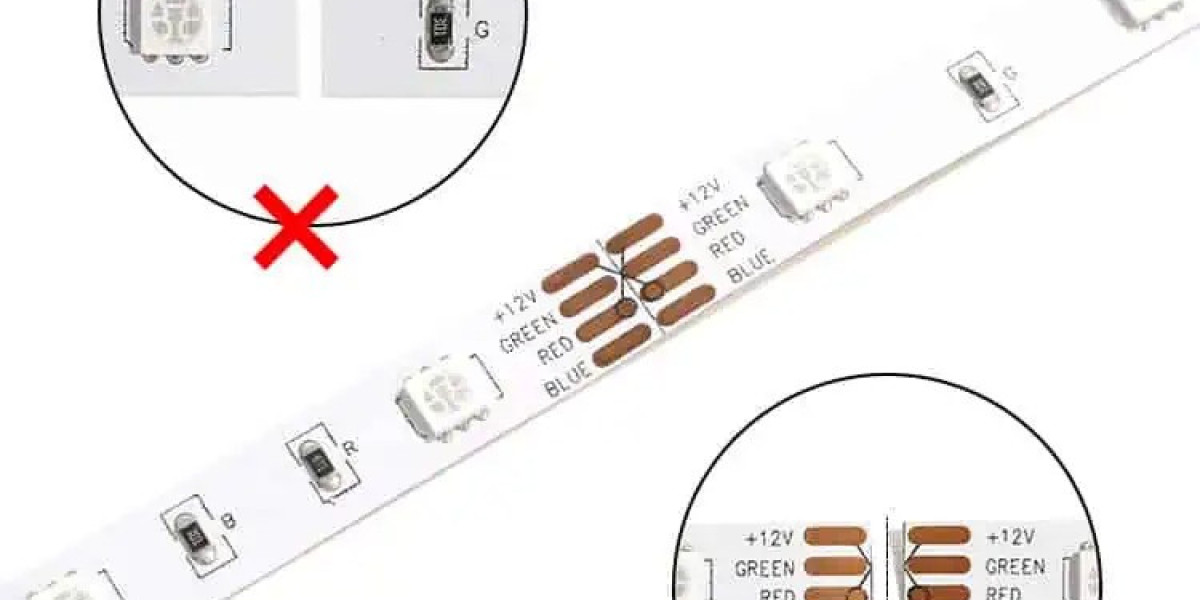
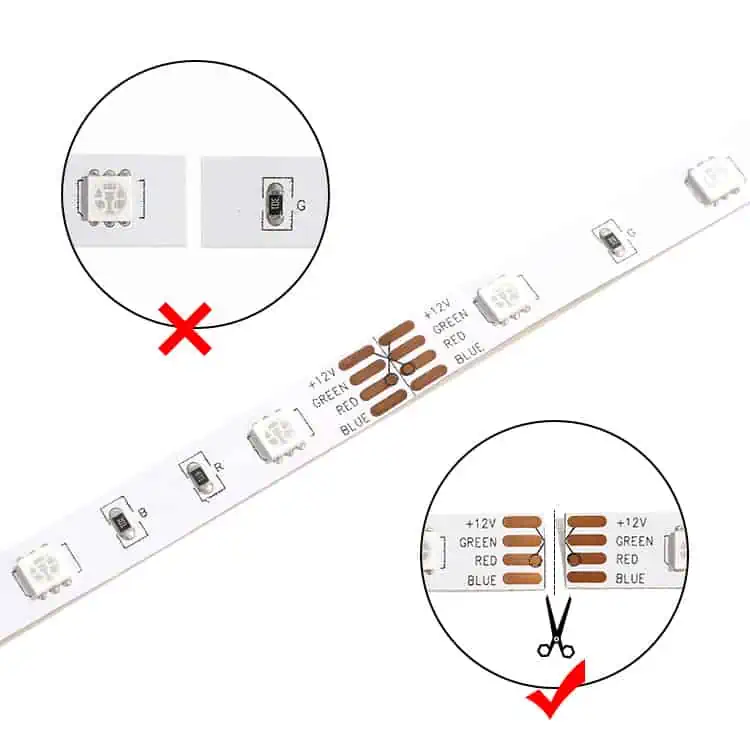
LED strips are typically categorized into different voltage options, such as 5V, 12V, and 24V. The number of copper pads on the strip determines the number of segments that can be cut. For example:
- 5V strips can be cut every single pad.
- 12V strips can be cut every three pads.
- 24V strips can be cut every six or seven pads.
The cutting point is indicated by a black line and an arrow on the strip. It is crucial to only cut the strip at the designated cutting point for the electrical connection to work properly. Cutting beyond or before the designated cutting point will result in no power being transmitted to the subsequent section of the strip.
Part 1: Cutting, connecting, and powering LED strip lights using soldering
1.1 Cutting, connecting, and powering IP20 non-waterproof SMD LED strip lights using soldering
- Step 1: Measure the desired length.
- Step 2: Locate the cutting point on the LED strip.
- Step 3: Cut the LED strip.
- Step 4: Solder the wire to the LED strip using a soldering iron.
- Step 5: Apply heat shrink tubing to protect the soldered connection.
- Step 6: Solder two LED strip pieces together using a soldering iron.
- Step 7: Test the LED strip lights to ensure they are functioning properly.
1.2 Cutting, connecting, and powering IP20 non-waterproof COB LED strip lights using soldering
- Step 1: Measure the desired length.
- Step 2: Locate the cutting point on the COB LED strip.
- Step 3: Cut the COB LED strip.
- Step 4: Solder the wire to the COB LED strip using a soldering iron.
- Step 5: Apply heat shrink tubing to protect the soldered connection.
- Step 6: Solder two COB LED strip pieces together using a soldering iron.
- Step 7: Test the LED strip lights to ensure they are functioning properly.
1.3 Cutting, connecting, and powering IP52 silicone-covered SMD LED strip lights using soldering
- Step 1: Measure the desired length.
- Step 2: Locate the cutting point on the LED strip.
- Step 3: Cut the LED strip.
- Step 4: Remove the silicone covering from the LED strip pad.
- Step 5: Solder the wire to the LED strip using a soldering iron.
- Step 6: Fill the LED strip pad with silicone.
- Step 7: Apply heat shrink tubing to protect the soldered connection.
- Step 8: Solder two LED strip pieces together using a soldering iron.
- Step 9: Test the LED strip lights to ensure they are functioning properly.
Read more: low voltage strip lighting indoor
1.4 Cutting, connecting, and powering IP65 silicone-covered SMD LED strip lights using soldering
- Step 1: Measure the desired length.
- Step 2: Locate the cutting point on the LED strip.
- Step 3: Cut the LED strip.
- Step 4: Remove the 3M adhesive tape.
- Step 5: Fill the LED strip with silicone and seal it.
- Step 6: Insert the LED strip into the silicone end cap.
- Step 7: Clean any excess silicone from the LED strip.
- Step 8: Cut some silicone from the LED strip pad.
- Step 9: Solder the wire to the LED strip using a soldering iron.
- Step 10: Fill the LED strip with silicone and seal it.
- Step 11: Test the LED strip lights to ensure they are functioning properly.
1.5 Cutting, connecting, and powering IP65H heat shrink-covered SMD LED strip lights using soldering
- Step 1: Measure the desired length.
- Step 2: Locate the cutting point on the LED strip.
- Step 3: Cut the LED strip.
- Step 4: Cut the heat shrink tubing from the LED strip pad.
- Step 5: Solder the wire to the LED strip using a soldering iron.
- Step 6: Apply heat shrink tubing to protect the soldered connection.
- Step 7: Solder two LED strip pieces together using a soldering iron.
- Step 8: Apply heat shrink tubing to protect the soldered connection.
- Step 9: Test the LED strip lights to ensure they are functioning properly.
1.6 Cutting, connecting, and powering IP67 silicone-filled and encapsulated SMD LED strip lights using soldering
- Step 1: Measure the desired length.
- Step 2: Locate the cutting point on the LED strip.
- Step 3: Cut the LED strip.
- Step 4: Remove the 3M adhesive tape.
- Step 5: Fill the LED strip with silicone and seal it.
- Step 6: Insert the LED strip into the silicone end cap.
- Step 7: Clean any excess silicone from the LED strip.
- Step 8: Cut some silicone from the LED strip pad.
- Step 9: Solder the wire to the LED strip using a soldering iron.
- Step 10: Fill the LED strip with silicone and seal it.
- Step 11: Test the LED strip lights to ensure they are functioning properly.
Part 2: Cutting, connecting, and powering LED strip lights using non-soldering connectors
2.1 Cutting, connecting, and powering IP20 non-waterproof COB LED strip lights using non-soldering connectors
- Step 1: Measure the desired length.
- Step 2: Locate the cutting point on the COB LED strip.
- Step 3: Cut the COB LED strip.
- Step 4: Insert the COB LED strip into the non-soldering connectors.
- Step 5: Test the LED strip lights to ensure they are functioning properly.
2.2 Cutting, connecting, and powering IP52 silicone-covered SMD LED strip lights using non-soldering connectors
2.3 Cutting, connecting, and powering IP65 silicone-covered SMD LED strip lights using non-soldering connectors
2.4 Cutting, connecting, and powering IP67 silicone-filled and encapsulated SMD LED strip lights using non-soldering connectors
Frequently Asked Questions
Conclusion
In conclusion, LED strip lights offer an excellent way to add light and ambiance to different spaces. With the right tools and proper power supply, anyone can successfully cut and connect LED strip lights. At LEDYi, we manufacture high-quality LED strip lights and flexible neon lights. All our products undergo rigorous testing in advanced laboratories to ensure maximum quality. Additionally, we offer customizable options for our low voltage light strip and neon flex lights. For premium LED strip lights and neon flex lights, contact LEDYi as soon as possible!